Micro:Bit — servo
Your micro:bit can control a servo motor

Turning lights on and off is all well and good, but making things move is where we start getting really fancy. Your micro:bit can control servos: tiny motors attached to gearboxes. There are several types of servo:
Whatever type of servo you use, you control them by giving them a target angle:
0° means ‘fully left’ (or ‘full speed backwards’ for continuous servos)90°means ‘centre’ (or ‘stop’)180° means ‘fully right` (or ‘full speed forwards’)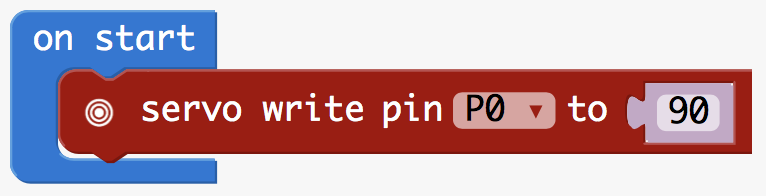
You’ll find servo write pin under Advanced, then Pins.
Build the program above. If you have the micro:bit simulator open, you’ll see a handy little diagram to help you wire up your servo:
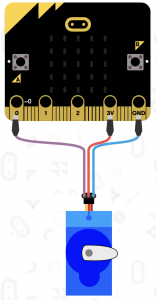
The colours of your servo’s wires might be slightly different:
GND pin on your micro:bit3V pin on your micro:bit. Your servo now has power.Connect your servo up, flash the code, and the servo should move. Hopefully.
It’s really easy to have two wires touching when they shouldn’t. Don’t do that. If your micro:bit starts to get hot, back away carefully.
This picks up from the gestures page, because we’re going to use the same ideas.

Try to work out what’s going on as you build the program.
Variables to help your micro:bit store and remember key bits of information.Map is useful for changing the range of the thing we’re measuring (tilt angle) to the thing we’re controlling (servo angle).from and to values in map different to the ones in the gestures example?In the gestures example we displayed a number on the micro:bit. Can you add that in here?
…or you could find some glue guns, cardboard, scissors, and masking tape, and start working out what your little servo does.
Ooh, and your micro:bit can also detect tilt… and you have two servos… just saying.
Servo write pin at the official micro:bit documentation.