Last month, the Institute of Physics released a report called ‘Why not Physics?‘
The report looked at how many students studied A-level science subjects in different schools in 2016. The good news is that the picture is a little bit better than when the IOP did a similar analysis 4 years ago.
The bad news is that there are still 44% of schools that don’t send any girls to study A-level Physics*.
As well as looking at the number of students who study physics in different types of schools, the report looks at how well students do in their GCSEs in different subjects, and how that affects their choice of A-levels.
“More girls achieve high grades in GCSE physics than boys, and girls generally outperform boys across the board at GCSE. However, a smaller proportion of girls have physics in their top four subjects at GCSE (65% for girls compared to 81% for boys). When a student does have physics in their top four results, boys are three times more likely to progress to A-level physics than girls.” pg.18
So, on average, girls tend to be doing well in all of their GCSEs, which means that even though they get a good grade in Physics, they also get good grades in their other subjects, which makes physics less likely to be in their top four subjects.
How do GCSE grades influence what subjects a student chooses at A-level? You might think that students will be more likely choose to study A-levels in subjects that they did well in at GCSE.
You can see in Figure 12 from the report that students are much more likely to study a science A-level if the respective GCSE was in their top 4 results at GCSE.
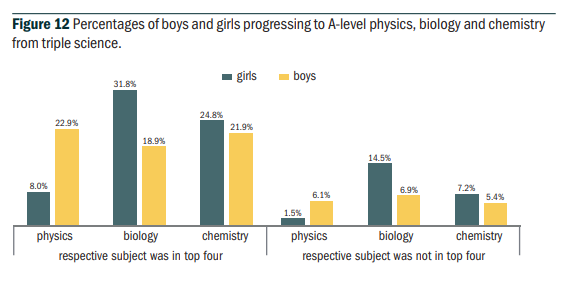
But what happened if a science was not in a student’s top four subjects.
There is no reason why students have to choose A-levels in subjects that were in their top GCSEs. In fact, there are good reasons relating to progression to university or employment, or simply enjoyment, that mean a student might choose to study an A-level that isn’t in their top 4 GCSEs.
Looking at the graph, boys tend to progress to a science subject that was not in their top 4 at about the same rate regardless of whether it was biology, chemistry or physics.
But wait … Girls are more than twice as likely to choose biology when it wasn’t in their top 4 grades, as they were to choose Physics when it was in their top 4 grades.
Read that again.
Girls are more than twice as likely to choose biology when it wasn’t in their top 4 grades, as they were to choose Physics when it was in their top 4 grades.
Why should this be? Why biology? Why not physics?
One of the recomendations of the IOP report is that:
Schools should provide effective careers guidance that starts at an early stage, focuses on the next educational phase, emphasises the benefit of choosing certain subject combinations to allow progression to a wide variety of opportunities, and actively challenges gender stereotypes and unconscious biases. pg.8
Here at NUSTEM we are working with North East schools to tackle unconscious bias, and minimise its effects on students. We offer CPD on unconscious bias for teachers, as well as for those who are involved in advising students about A-level and career choice.
If you would be interested in having NUSTEM work with your school on unconscious bias, then get in touch.
*This slightly weird definition means that we can also look at schools which don’t have a sixth form, and track where their pupils go.

 If you haven’t seen this image doing the rounds – sorry, we don’t know who originated it – you very likely recognise the situation anyway. It’s been several months and this song is still everywhere.